Feeds:
Posts
Comments

So my little brother is getting married! He met an amazing woman and they are getting married in January. Of course I was looking forward to throwing her a bridal shower, I love throwing parties, it is a chance to really get creative!  Her flowers for the wedding are black Calla Lily’s (a really dark purple)… so we used this for the shower theme too. I decided I would help out by making flower pens and purple calla lily cupcakes.

The flower pens are a simple thing to do but it added a nice small detail and they were great for decoration to. The hardest part of this was finding the dark calla lilies, but hobby lobby came though for us. First I trimmed the stem with wire cutters, with this flower I left it as long as the length of the pen. Next I cut up the stem, cut out the wire that was inside it and wrapped the hollow tube stem around the pen. Then you just need some floral tape and wrap it around the whole trunk of the pen. I arranged all of the pens in a vase so that they were a cute decoration and when it was time for the games we just passed around the vase and everyone took a flower.

The second project was the calla lily cup cakes.  I made mini cupcakes because I had a new pan and cupcake stand that I wanted to use…plus it was a bunch of women whom I feel like would never take a whole large cupcake. We feel much less guilty eating one (or a couple) small cupcakes.

I am no cake decorator (as you will see) so I just make up what I am doing, I’m sure there is a much better way to go about this but here is what I did. I made the calla lilies out of gum paste, you could use fondant too but the website I was reading recommended gum paste( though both, in my opinion, taste horrible). The hardest part of the is whole project was making the gum paste dark purple! I had a dark purple gel dye and I added red, blue, black… and it took me an hour and REALLY sore arms to make the gum past semi dark purple. I gave up after an hour because, as you can see below, my hands were more purple than the gum paste.

When I finally got a decent purple I took a small heart shaped cookie cutter cut out the gum paste and then wrapped the heart around a frosting tip shaping it into a calla lily. Then carefully remove the frosting tip and set the calla lily aside to dry. I also dyed some of the gum paste yellow for the stamen. I just rolled that out and stuck it in the middle of the calla lily.

I let the calla lilies dry over night, they lightened in color a bit so I painted a very light coat of vegetable oil on them before I put them on the cup cakes and this seemed to darken them nicely. I made devils food cup cakes as this was the brides favorite with vanilla frosting so that the calla lilies would stand out. It was a lot more work than I expected but I do love how they turned out!

I’m preparing for an up coming craft fair. I am working on mostly fall things, but every once in a while I like to mix it up.  I had bought a bunch of little girl headbands for my daughter but she still does not like to keep them on her head. I decided to make a bunch to sell and maybe someday my daughter will keep them on her head!

I bought the plain headbands at target… but they needed some embellishing. I love the look of the rolled rosette and had some good fabric scraps.  I made some rosettes by folding and rolling some fabric on a felt circle backing.  I use hot glue because it dries very quickly. Then I sewed and then hot glued the rosettes to the headbands… I thinkthat the headbands are much cuter now!

Beginnings of Fall

I woke up to the cool crisp air on my cheeks on my walk this morning and I’m really feeling the beginnings of fall. As much as I’ll miss summer there are so many fun things too look forward to in the fall. First of all the fall means I’m just that much closer till I get to meet my first son! Some of my other favorite fall things are the beautiful changing of the leaves, apple picking, warm soups, pumpkin desserts and of course fall crafts! I’m struggling to find time this season but here is my first idea… pumpkin onesies.

I had made the girly one first but now that I’m expecting a boy I could not leave the boys out! I love how both of them turned out! If you like them too you can buy them on my etsy site!

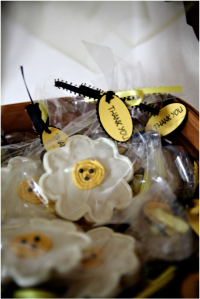
There were families that came to my party with little boys and girls, so I wanted to come up with a favor that everyone would enjoy.  I think everyone loves cookies! I know I absolutely love sugar cookies… you know the thick kind with lots of frosting on top! So, I decided to give it a shot.  I found a good sugar cookie recipe online and then also found a good royal frosting. I needed a frosting that would dry so that I could put them in individual bags. This was definitely much more work than I anticipated but I’m happy how they turned out and am excited to have a good cookie that I can make and send for holidays!

I needed something for my little girl to wear. I had a cute dress but I love the little t-shirts with numbers on them for children’s birthdays. I found a yellow t-shirt, and some black and white polka dot fabric. I cut out a number 2 for the front and free-hand embroidered it on. I then added 2 ruffles on the bottom of the shirt for a skirt so that it could be worn with leggings. I wish I would have done this for her first birthday too!

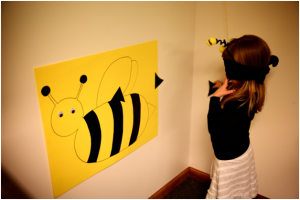
This was a kids party and I wanted to have some fun things for the kids to do as well.  I changed the classic game of “pin the tail on the donkey” to “pin the stinger on the bee” the kids really loved it!  The other game that I had was bag-o (there are other names for it too) but I just drew daisy flowers on poster board, cut out the middle and put them on our boards that we already had.  Then I made black and yellow beanbags for the kids to throw into the center of the flower (I really wanted to find little bean bag bees, like beanie babies but I had no luck).

Lastly, I had a crafts for the kids to keep them busy.  I just had some crayons, bee stickers and paper so that the kids could color. My wonderful sister in law is great at making balloons animals, so she made bees and lady bugs! I also bought some headbands at the dollar store, had my brother spray paint them black. I then bought black pipe cleaners and yellow puff balls and the kids made their own bee antennas.  The kids were so cute running around pretending to be bees!


We decided to have a Bee-Bee-Q in honor of the bee theme and also because I love my friend’s BBQ pulled pork and it’s a great way to feed a lot of people. We also served baked beens, cheesy potatoes (I could not think of anything for that) and lemonade (because its yellow). I made little table cards indicating each food name and spelled them out for the bee theme.

In the food section I will put the dessert, but I cannot take credit for the amazing desserts! I put my mother in-law in charge of the desserts because she likes making cakes and she did not disappoint! First of all she made a bee cake, she found a bee mold it was very cute!

If that was not enough she made 2 different sized cupcakes and placed them in clay pots which were decorated. In each cupcake was a flower on a popsicle stick, on each flower was a letter that spelled out “Happy Bee-Day.” Also in the pots were red M&Ms that were colored to look like lady bugs and green M&M’s stuck together with frosting to look like caterpillars!

Lastly, but certainly not in the least we had bee cake balls.  If you don’t know what a cake ball is I’m sorry… you will have to try one somewhere they are amazing! My father in-law built a bee hive with foam and painted it yellow, and then all of the little bees were on sticks swarming around the bee hive.

Well, I had seen some super cute birthday signs selling for around $30.  I could not spend that much on a onetime use sign, so thankfully my mom has a cricut and I could make my own! I love how this sign turned out! I will definitely do this again for other occasions!

I pretty much was on a hunt for anything black and yellow. I used black dinner plates and yellow dessert plates.  I also found a cute basket with bee’s on it that I put the silverware in. I wrapped the silverware and made paper napkin rings with a picture of a bee on them.

So let’s travel back to April…It was my daughters 2nd birthday and I was working on things for her party.  My daughter has a book called “Bobby Bee” which she just loved.  There is also a puzzle a bee at the library and as soon as we walk in the door she says “Bobby Bee, Bobby Bee!” meaning she wants to do that puzzle.  So, we decided to throw her a bee themed birthday party or a happy bee-day party (cheesy I know but she is 2 so I can do that!) Since, I know you are curious about what we did for her party here to come are a couple blog entries on her birthday party. (Thanks to my wonderful and talented friend Brooke for taking pictures! Here is a link to her blog check it out!)

too long…

I apologize for being absent here for a while, okay….too long.  I have an excuse… I’m not sure if it’s a good one or not but I sort of stopped writing since I found out that I was pregnant! I’m due December 15th!  Hooray, now I’ll have even more motivation to get creative! I was very tired in my first trimester, so I’d go to bed early. Now I’m in my second trimester and have a lot more energy so, I’ll do my best to make up for lost time….